

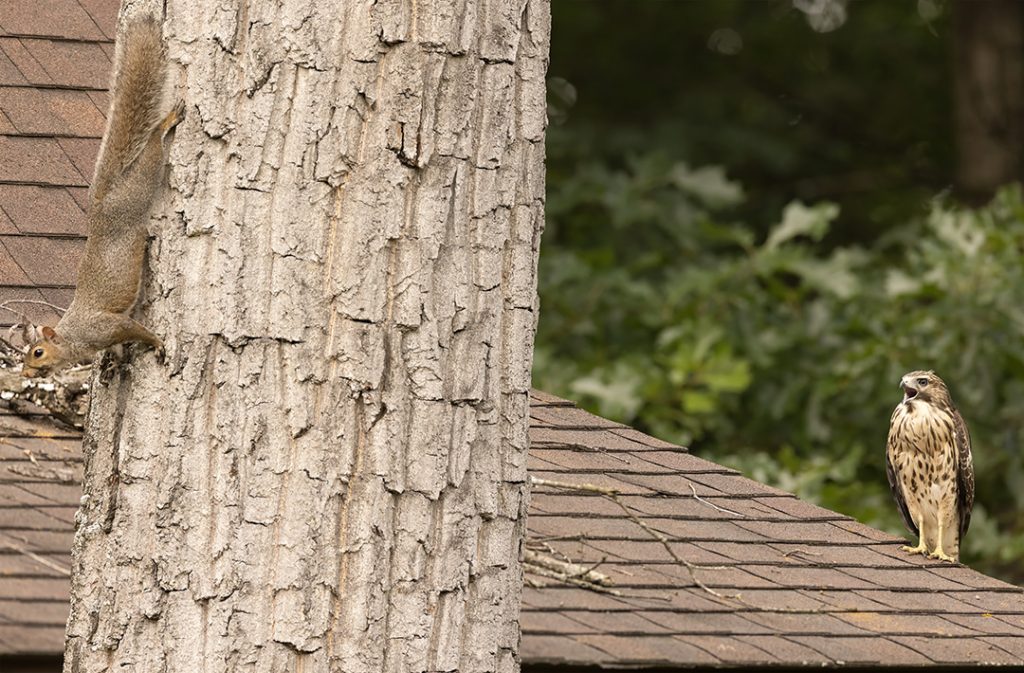
You have likely learned, by now, that a “student” Red-shouldered Hawk has kept me entertained as I prepared this issue. While I’ve heard three birds calling at once, I normally don’t see more than one at a time. He perches in similar spots and drops to the ground in the same general area over-and-over, which has made me refer to this fellow as “The Bird.” In truth, though, it is multiple birds. Two days ago, two birds sat on this roof yards apart, for the first time that I saw.
I have been placing a camera in the doorway blind, oftentimes, so I can easily take photos whenever I wish. The fellow is often close by somewhere—I hear him out there screaming as I write this.
If you have already read “Birding at Nature Friend,” you know I’ve shot a lot of photos, and why. But let’s take a closer look at what is going on to make the photos come together. After all, a camera doesn’t take photos by itself any more than your oven makes cakes by itself.
I am well aware of how hard it can be to capture movement of any kind, including in-flight photographs that are in sharp focus on the eye. I’ve tried a lot of things, over the years. But, to fast-forward to today, I will begin by mentioning I am currently using a Canon R5 camera. That camera has a lot of advantages for this kind of photography. But, just knowing it has advantages doesn’t help if you don’t learn how to tap into those advantages. That was my situation for a while. I bought the camera to replace a stolen camera. I used it just the same way as my old camera.
My reason for mentioning the camera isn’t to discourage you if you do not have one. For some of the tips today, owning a similar camera doesn’t matter.
The squirrel and hawk “story” happened. However, with a 600 mm lens and a reasonably fast shutter speed, I could not have both critters in sharp focus at once. I could have thought Too bad. But, I chose to shoot the same scene two ways, once with focus on the hawk and once with focus on the squirrel.
With the two originals, it would then be a matter of combining the sharp aspects of one photo with the sharp aspects of the other, to make a pleasing composite.


I use Photoshop, so you may need to adapt what I did to software you use, if you don’t use Photoshop. I quickly recognized that, from the sharp squirrel photo, I could easily extract the squirrel and tree apart from the fuzzy background by using the object selection tool. By making the selection and deleting the background, it would be simple to place the squirrel and tree over the fuzzy squirrel and tree on the sharp hawk photo. But that strategy has one curve that needs to be addressed.
As objects go out of focus, they enlarge. The sharp tree and squirrel pasted on top of a fuzzy tree will still show a fuzzy “halo” around the sharp squirrel. To remedy that, I enlarged the squirrel/tree selection by 4%. This simple tweak quickly covered the fuzzy edges for a clean result.
The second tip pertains to a camera feature that I did not have with my previous camera models, but now do have with the R5. I can set the camera to track eye movement, keeping the eye in sharp focus as the subject moves.
A second feature I have the option of using with the R5 is back focus. I have set two buttons, one on either side of my thumb, to be the focus buttons (as opposed to shutter depressed halfway). By pressing the left button, I get sharp focus at the square, wherever that is positioned. If I press the right button, the camera locks onto an eye that is nearly in focus, and it maintains focus on that eye even if the bird flies.
The camera handles high ISO settings quite well, which enables faster shutter speeds than I could have historically used.
Combining all of this, many times I am able to freeze movement with sharp focus on the eye. Topaz software can denoise and sharpen further, if desirable.
