

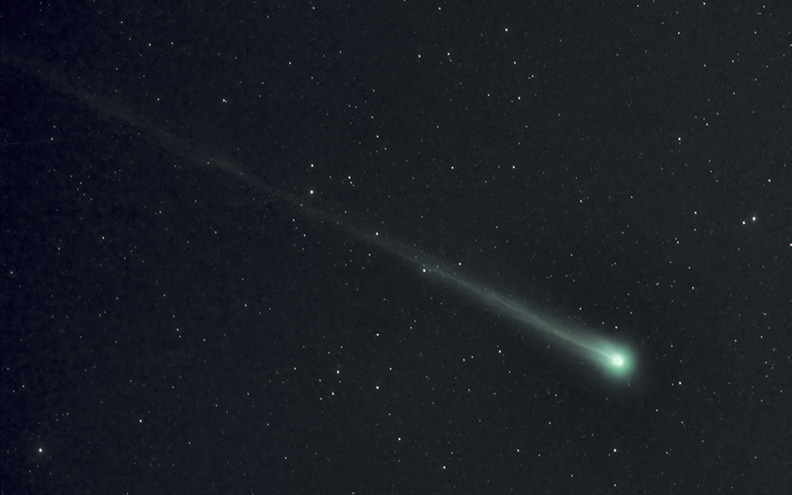
Comet Lemmon and Comet ATLAS are in the skies right now. With Comet Lemmon’s prediction for possibly seeing a tail without any optical aid in late October/early November, many of us might be trying to capture photos.
While this series of photo lessons were just run a year ago when comet Tsuchinshan came through, to our great delight, I’m running them again for several reasons. For one, new people are coming on board and reading this for the first time. But also, I find I need refresher training myself. These techniques, after all, aren’t used very often by me, so I soon forget what I used to know.
The photo above is one that Adrian and I worked at together. We were pressed for time—dawn would soon come—and under that pressure we didn’t remember to change file types. We shot this picture in video as if shooting a planet. The astronomy camera file type should have been set for .fits but was instead on .ser. That introduced its own curly-cues. I found myself working hours and hours in post processing to finally arrive with the photo above. Even though I quit, I want our next attempt to surpass this. I hope to learn more about this topic. If I do, I may write still another lesson. I hope I don’t bore too many, but I’m writing for me. I want to document what I learn so I can refer back to it the next time a comet series of photos needs to be processed.
A reader says, “Something I would find extremely valuable, but most of your readers would not, is how to stack long focal length comet photography where the comet moves substantially across the star field over the course of a photo session. Successfully stacking a series of photos like that and retaining pinpoint stars and a tight nucleus of the comet is challenging for me.”
I have the same questions. Maybe someone can learn this and teach the rest of us.
Part 1
Comet NEOWISE caught me off guard. I wasn’t tuned in to the fact that there was a bright comet around, until suddenly I was.
I quickly did a search to see what equipment/settings other photographers were using to capture their photos, then set out to do something similar.
My first effort was in a morning, and that was not successful. First of all, I should have gotten out earlier while it was still darker. We thought it would be much lower in the sky, and therefore only visible near sunrise. In addition to being late and rushing dawn, initially I got the focus set a tad off infinity, so the focus was soft.
My next effort was in the evening from our driveway, looking northwest over the lake. Again, I used someone else’s settings, against better knowledge, and came up with a photo that was inferior to what it could have been. I used f/8, and should have used f/2.8. (The lower the f/number, the wider the aperture. The wider the aperture, the more light enters the camera.) The extra light would record the comet brighter, and in more detail. I used a 70-200mm lens set on 70mm.
Another night I shot the comet with the same lens set at 70mm, but this time at f/2.8. The detail in the comet was much better. I used “artistic license” to put together a composite that illustrated the comet over the lake with the detail I should have captured that first evening.
The comet and the stars are much more powerful because of the extra light from the wider aperture during the exposure.


How to Keep Stars From Streaking
As you know, stars will streak during an exposure, if the camera shutter is open too long. Just how long the lens can be left open without streaking varies, depending on the focal length of the lens used, and the sensor size of the camera.
One of the valuable tips I learned when I researched what exposures others were using, was a quick formula to use to learn the longest exposure for a given setup. To understand the formula, first we must understand the camera’s sensor.
Digital cameras have a sensor that records the light. A full-frame sensor compares to film cameras of yesteryear. With these cameras, 50mm is considered a normal lens (1x), meaning it is not a telephoto, and neither is it a wide angle lens. To go longer than 50mm, the lens is a telephoto, while going shorter is a wide angle.
Some digital cameras have a smaller sensor than full frame. These cameras are said to have a crop factor of 1.6x, 1.5x, or something similar.
A quick guide (that is nothing other than a guide— not scientific) astronomers have figured out to determine exposure times so stars remain dots, is to divide the focal length of the lens into 500, for a full frame camera. The answer is the number of seconds that lens can be used without stars streaking.
For us, that meant our 400mm lens could be open 1.2 seconds, our 100mm lens for 5 seconds, and so on.
For crop-sensor cameras, first of all multiply the crop factor by the focal length, and then divide 500 by that product. An example would be to multiply 1.6 x 50 (50mm lens) = 80. 500 divided by 80 equals 6.25. 6.25 seconds would be the approximate maximum shutter speed.
Dealing with Digital Noise
High ISOs also enable the photo to record more light than low ISOs, but with them comes digital noise. While this article is not intended to teach all the aspects of photography referred to in this article, such as understanding f/stops and digital noise, I do want to explain how we deal with the noise when we can.
First, we aimed to shoot thirty or forty identically composed shots of the comet. These are called light frames.
We shot multiple series of shots per evening. Before quitting for the evening, though, we shot a series of dark frames. For these we put on the lens cover. It is important that dark frames be taken at the same outside temperature, so shooting at the same event makes sense. Also, these must be taken with the same shutter speed and lens used for capturing the light frames. So, multiple sets of dark frames needed to be taken, to accommodate photos from the various lenses we used for the photography.
Back home, I stacked the light frames of a given set of photos, and averaged in the appropriate series of dark frames. Nebulosity is the program we like to use for stacking photos.
The factual information of the stars and comet remained on the final photo composite, while the random noise was averaged out by the dark frames that were included in the composite. This technique is valuable for turning a “trashy” original into a “fun” photograph.
Our favorite place from which to photograph Comet NEOWISE was high on the Shenandoah Mountain at the Virginia/West Virginia line. We were far removed from any significant light pollution. The skies were dark enough from there that we could see the tail of the comet without optical aid, at a length that compared to our thumbs when held at arm’s length—approximately six or seven degrees.
We set up three cameras using three different lenses. Cheryl, Adrian, and I each ran a camera. Sometimes we rotated to the next camera so we could each have a turn using the various lenses.
Friends and family not doing photography could sit back and enjoy the starry skies, the rare comet, and the occasional streak of a speedy meteor. While photography can preserve some of the memories, it does not capture the beauty of family, friends, and fellowship under the majestic starry heavens God created for both His pleasure and ours.


Part 2

After writing Part 1, I learned a better way to reduce the digital noise in a photo like this. I had tried repeatedly to get this photo to stack to remove the noise, but I could not get it to stack successfully with the software I normally use.
I wondered if there might be other software somewhere that would do the job. I learned of “Starry Landscape Stacker,” and thought maybe that would be the answer. But that software was only available for MAC, and I’m using a PC. So that was out for me.
When photographer Steven Smith learned of my interest, he pointed me to Sequator. He had just used Sequator for the first time that morning on a Milky Way photograph, and he was impressed. Between his instructions on the phone, and about five tries (that take minutes instead of a long time as some software would), I had very pleasing results.
The Basic Steps
Open Sequator. In your browser, highlight the series of photos you want to stack and drag them into the software. A list will pop up from which you choose “Star images,” “Noise images,” or “Vignetting images.” For the original photos (light frames) choose “Star images.”
The photo file names will populate in a list at the top of the left margin. Below that is “Base image.” The program will choose one by default, but you can change it. I chose a specific one that showed a touch of the lightning bolt.
Highlight the series of dark frames you took (noise images) and drag those into the software. From the list that pops up choose “Noise images.”
You can skip the vignetting images like I did.
Click “Output,” and give your soon-to-be-created file a name.
At the bottom left margin, click on “Composition: Align stars.” You have the choice to align stars (pinpoint) or trails (star streaks), as well as some other choices. I chose to freeze the ground, as I wanted to have a single photo provide the lightning and trees.
Click “Sky region: Full area.” Since I wanted to preserve the foreground, I chose “Irregular mask,” and painted the sky. A brush is there by default when you move your mouse on the photo. I painted the sky but not the foreground. The painting does not have to be perfect on the margins of sky and ground.
Click “Start” at the bottom, and the program will begin its work.
As I wrote this, I also did a test to see the various steps again. For the test I used 21 photos (light frames) and 21 dark (noise) frames. The stacking was complete in 1 minute 57 seconds.
To achieve the result on the motto, Cheryl took a series of 13-second photographs, at ISO 12,800 and f/4. To remove the digital noise, I stacked 52 light frames and 40 dark frames.
I experimented with lesser quantities of light frames and darks, but those were less successful in removing the digital noise. So when you can, shoot a lot of original light frames.
The result I was able to achieve took out the noise in the sky among the stars, but the colors in the thunderhead were really messed up. So, for the foreground, I copied the foreground in the original frame and pasted it on a layer over top of the stacked sky photo. The two layers were blended together in Photoshop. I continued to process this photo in Photoshop, adjusting colors, light levels, saturation, and so forth, as I would for any other photo.
I minimized the noise in the clouds by using an app in Photoshop called “Imagenomic.”
Now is a good time to get some nighttime photos of the Milky Way. Take a lot of them, along with dark frames, and learn to stack them to reduce the noise. It will open a door into some very rewarding photography experiences.

