

The rich, deep, bubbling notes of the bluebirds arriving in early spring are often heard before we spot the birds. It is then that we get concerned if enough bluebird houses are ready for them, remembering that Tree Swallows may try to claim the very self-same ones!
You will need:
- Soft-lead pencil colors
- Regular paper
- Cardstock
- Black fine-tip marker
- Pencil
- Foam sheet
- White gel pen
- Decorative chalks
- Acrylic paints
- (or pencils): Black, gray, dk. brown, sky blue, true blue, indigo blue, orange
- #20 fat brush
- #0 round brush
- #4 or #6 flat brush
- #1 fine-tip brush
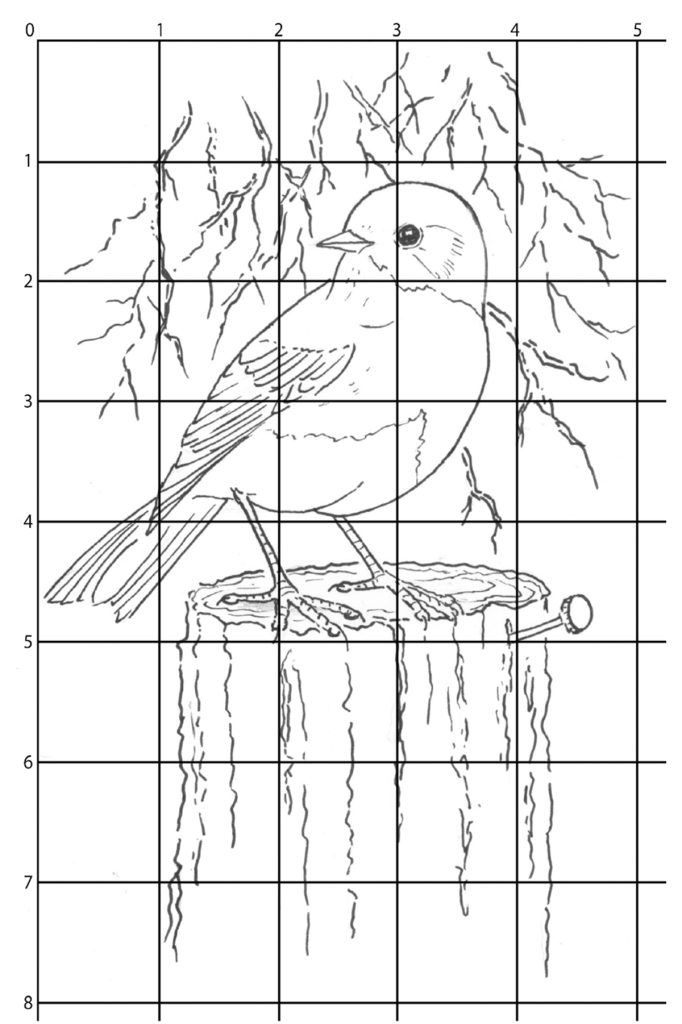
- On regular paper, lightly draw 1” grid lines. Sketch your bird block by block as the guide picture shows. When you like what you see, trace over your lines with a fine-tip black marker. Now place your drawing under cardstock and trace your entire scene.
- Your bird scene is ready for color. With your fine-tip marker, do the eye first, leaving a highlight. Or you can always add that later if the eye still needs it.
- Place your drawing onto a foam sheet. Using an underhand grip, sweep sky blue over its head, wings, and tail. Darken head with indigo blue. Now, on a hard surface, press hard with indigo blue to add feather divisions. With white paint or a white gel pen, touch in a bit of white to wing and tail tips.
- Lightly sweep in orange and a bit of brown for its body. Also touch in a bit of gray in the lower body. Wait to do the legs and feet until the post is done.
- Again with underhand grip and the foam sheet, color in the post with brown. Thin down brown paint to a wash; then go over the entire post. I added a cream-colored wash to lighten the middle of the post. Next, with your finest brush, paint in black squiggly lines for the cracks in the post.
- The legs and feet are a mix of watered-down indigo blue, with a bit of black. Then touch in highlights with white or cream paint.
- If you wish, thin down indigo blue paint. With a #4 or #6 flat shader brush, brush over its head to add depth. You can do the same with an orange wash for its body. Now, does it look as it should? Add a little here; touch up a little there!
- With chalking and your fat #20 brush, brush in a blue-purple sky.
- Now you can paint in the twigs. You can do this step with a #1 fine-tip brush, using a mix of black and brown paint slightly watered down. Years ago an artist told me that shaky hands make the best twigs. So let your hands shake a bit! (Don’t be too concerned about the exactness of these twigs—just so they look like twigs!)
- All finished? Be critical, but, finally, consider that you are really and truly done, and sign your name!
